

How to Fix 100% Disk Usage Error in Window 10
Windows, like whatever other operating organisation, is prone to errors, and sometimes, it's a little on the abundant side. Equally the Bone has matured over the years, the number of common errors has reduced, only unfortunately, some new ones have started popping upwardly. One very specific error that we see on Windows 10, and that initiated with Windows viii and 8.1, is the 100% Deejay Usage Error. Effectively, what this does is scale your difficult deejay usage to full, resulting in everything slowing downwardly to a crawl and a very frustrated end user. Luckily, in that location's a fix for that, and in this post, we'll discuss how you can prepare the 100% Disk Usage fault on Windows 10 and below.
Notation : For the purpose of this article, we'll be specifically discussing Windows 10, although the solutions can use to previous versions of Windows as well.
What causes the 100% Disk Usage Error
While in that location can be a multifariousness of reasons backside it, mostly, this error is caused by some Windows services similar Superfetch, Prefetch, BITS and Windows Search. While these factors are the usual suspects, they're not the sole ones; there can exist a multifariousness of others, including malware, Flash and even a really old and wearisome difficult bulldoze.
Determining if y'all have the 100% Disk Usage Mistake
Determining that yous really are facing this error is easy yet important, because you don't want to go around making changes to your computer for zero.
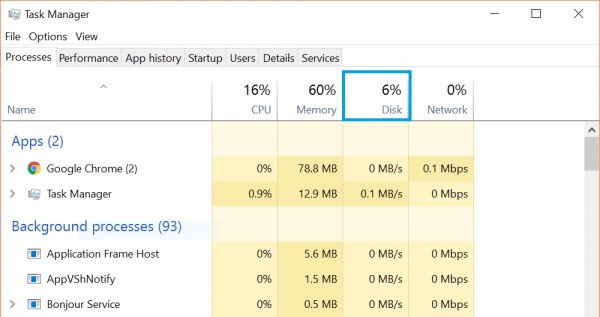
While the slowness of your machine volition exist a adequately good indicator (along with a constantly on hd calorie-free), you lot can verify the issue past pulling up the Task Manager in Windows 10 (but hit Start and start typing Task Director, or press CTRL + Shift + Esc). In the Processes tab, the Deejay column will be showing 100% if the error exists; if not, you'll run across something like to the screenshot below.
Fixing the 100% Disk Usage Error
Assuming your car is suffering from this outcome, hither's how you can set information technology:
ane. Do a virus scan of your Windows x computer
This might seem like a general, mutual sense advice, nevertheless it's crucial that you perform this activeness as your first remedy in this case. Many a times a malware infection can be the culprit and you can do whatever else yous want, it won't fix the result. Better to be sure beforehand in this case. You can use any good antivirus software for this purpose.
2. Disable Windows 10 Superfetch service
Superfetch is one of those Windows services that volition e'er have the potential of delivering a bittersweet user experience. The premise behind Superfetch is that Windows volition acquire from your usage habits and "guess" which applications/services you're virtually likely to use next. Based on this prediction, the OS will cache those apps and programs to the RAM, and then they'll load faster. Now, in theory, that'due south a fantastic concept, merely unless yous're a robot that's programmed to follow a particular routine, Superfetch'south predictions are jump to miss from fourth dimension to fourth dimension. And because the service is busy pulling all those predicted app files and data from your hard disk, you lot get the 100% Disk Usage mistake.
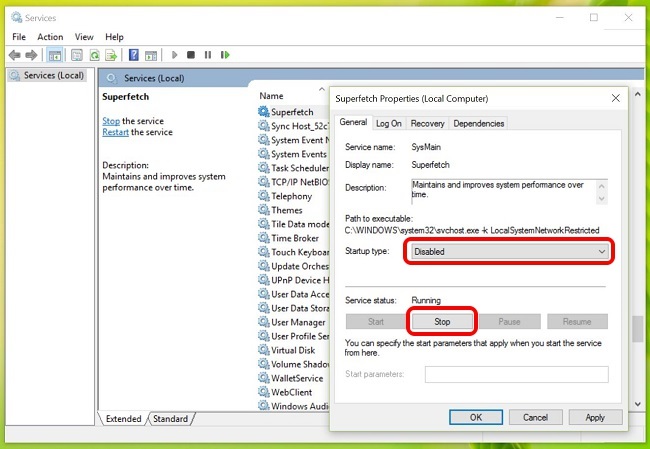
Disabling Superfetch is merely like disabling any other Windows service. In Windows 10's search, type Services and open the Services dialog. Within hither, find the Superfetch service, and right-click to go to Properties. Hither, Stop the service and in Startup type, make sure it says Disabled. Hitting OK and restart your Windows 10 computer for practiced measure.
iii. Disable Background Intelligent Transfer Service (BITS)
BITS is yet some other Windows 10 service that'due south supposed to be helpful but can turn out to be quite the opposite. The idea behind $.25 is that when your computer is sitting idle, the bandwidth can be used for Windows Update, Windows Defender and the like. While information technology usually works merely fine on newer machines, older hardware can really suffer while BITS tries to decipher when the estimator is actually idle.
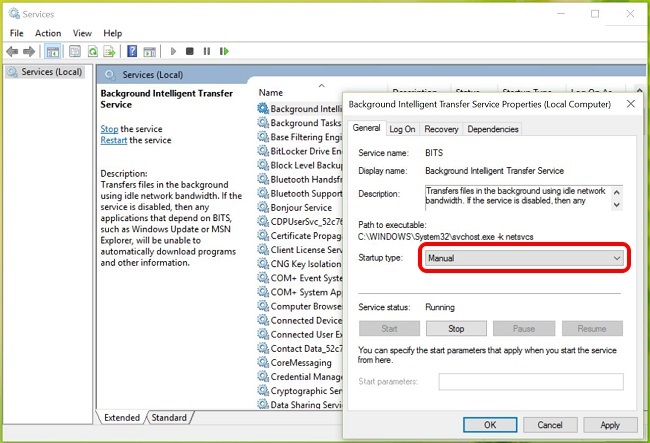
Disabling BITS will exist simply like disabling the Superfetch service, except that in this case, yous won't disable the startup birthday; instead, you'll opt for Manual.
4. Disable Windows Search
This is i of those "solutions" that I'd mostly not recommend unless absolutely necessary. For quite some fourth dimension now, Windows has had a very robust search function that indexes everything on your automobile, making it easier to find files and all other content. While the feature is all great, 1 rather persistent issues has been the "search loop", where a system running Windows will incessantly re-index files and folders over and over. One quick way to identify if this is the cause of 100% Disk Usage is very low CPU and Memory usage in Job Manager along side 100% Disk Usage.
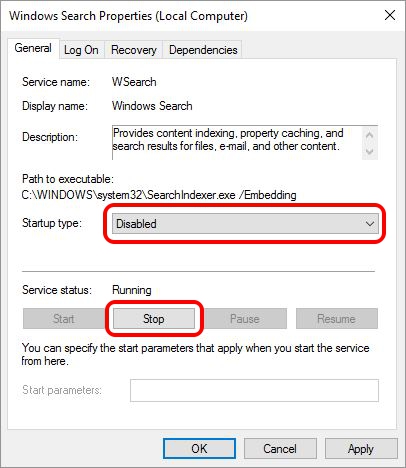
The drill is over again the aforementioned here: find Windows Search in Services, right-click for Properties and Stop the service while disabling the startup. If this was the culprit, yous'll encounter an immediate bear on.
five. Disable Windows 10 Prefetch
Windows ten also bundles a neat feature to complement Superfetch: Prefetch. While Superfetch caches data to RAM based on intelligent guessing, Prefetch works when y'all launch those applications. Essentially, Prefetch records information on files that are used by whatsoever given application, and then pulls those files to RAM to improve app loading times.
Because it's over again intelligent guessing by the OS hither, there is a likelihood that the Prefetcher volition miss. And information technology does. And when it does, disabling information technology remains your logical option. However, Prefetch isn't your standard Windows service and tweaking information technology required making changes to Windows Registry, which is why we recommend this as a very last-resort solution only.
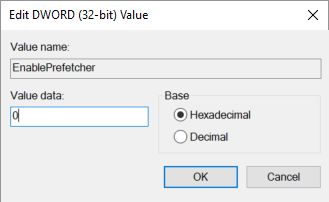
To open up the Registry Editor, type regedit in Windows x search bar and striking Enter. In the folder tree, navigate to the following location
HKEY_LOCAL_MACHINE\Organisation\CurrentControlSet\Control\Session Managing director\Memory Management\PrefetchParameters

In the right side pane, you lot'll see an entry for EnablePrefetcher. Double-click it and alter the DWORD value from 3 (default) to 0 to completely disable the service. Y'all may besides put in i as the DWORD value, which will keep Prefetcher partially enabled only disabled for boot files.
Please note that you'll need to restart your calculator for all these changes to have effect.
6. Run CheckDisk
CheckDisk is one of the oldest command line tools at the disposal of Windows users, and i that's usually helpful. This will come in handy if there's a problem with the concrete hard drive, the folder tree or annihilation of that nature with your Windows installation. The best approach towards running CheckDisk is to do so when your system reboots, and then y'all'll demand to really schedule for that. Luckily, that'south fairly easy.
Launch an elevated control prompt (blazon cmd in Windows 10 search bar, right-click and select "Run Every bit Administrator") and run the following command:
chkdsk /f' /r C:
where C: volition be replaced past whatever drive alphabetic character you've assigned to your Windows installation. You'll run into a bulletin inside command prompt that volition enquire you lot to confirm whether you'd similar to run CheckDisk on adjacent system reboot. Acknowledge with a Y, and restart your computer. CheckDisk might accept some time to finish, but information technology can be very useful not just for 100% Deejay Usage error but another issues as well.
7. Disable Windows Tips
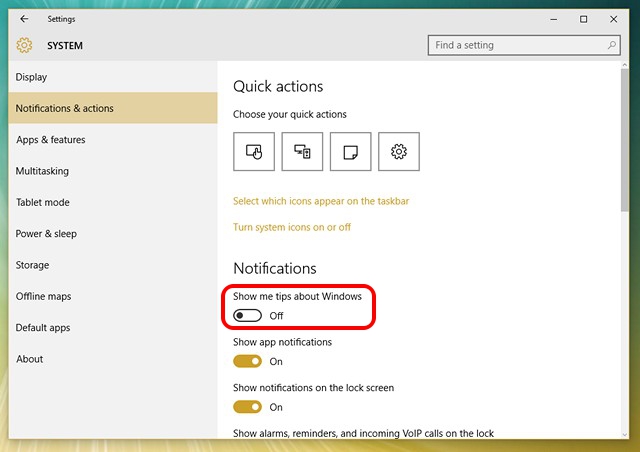
This i did not brand sense to us, only a lot of people have reported that this did the trick for them. Windows 10 offers tips near the operating arrangement from fourth dimension to time, and disabling those seems to have helped mitigate the 100% Disk Usage error for a multifariousness of people. Nosotros note this here because you won't be losing much in disabling those tips, and it's pretty like shooting fish in a barrel to practice. Just go to Settings, and so to Organisation and then Notification & Deportment. Disable "Testify me tips most Windows" in this list, and voila!
Meet ALSO: How to Ready High CPU/Memory Usage in Windows ten
When all else fails… and otherwise, as well
While this concludes our list of suggestions for fixing 100% Disk Usage error, there'southward i more thing that we'd recommend whether you take this error or not: upgrade to an SSD. They are the future, and for a reason; traditional hard drives can simply not compete with the performance of an SSD. They're wicked fast, they're far more reliable, you're far less probable to ever face the disk usage error with an SSD, and they'll brand your whole computing experience a lot more pleasant. Invest in an SSD, and you'll find it worth every dime y'all spent.
Well, that's all from our side and we hope the same means helped you fix the 100% disk usage error on your Windows PC. Do permit us know if you have any doubts in the comments section beneath.

Source: https://beebom.com/how-fix-100-disk-usage-error-windows-10/
Posted by: whytewithem1953.blogspot.com
0 Response to "How to Fix 100% Disk Usage Error in Window 10"
Post a Comment