

How To Install Sql Server Integration Services 2016
We offer private, customized training for 3 or more people at your site or online.
Microsoft says that SQL Server Integration Services (SSIS) "is a platform for building high performance data integration solutions, including extraction, transformation, and load (ETL) packages for data warehousing." A simpler way to think of SSIS is that it's the solution for automating data movements. SSIS provides a way to build packages made up of tasks that can move data around from place to place and alter it on the way. The majority of your package design work will be done in SQL Server Data Tools (SSDT). In this series of tutorials, you'll see how to build and use SSIS packages.
In this first tutorial we'll look at a simpler facet of SSIS: The SQL Server Import and Export Wizard. Although this tutorial was designed for SQL Server 2016, the majority of the steps will work with any version 2012 or higher.
In this SSIS Tutorial, you will learn:
- How to launch the SQL Server Import and Export Wizard
- How to move data from one SQL database to another using the wizard
To accomplish the exercises in this tutorial, you will need the following:
- SQL 2016 Relational Engine (tutorial created on SP1 CU5), SSIS, and appropriate database permissions
- SQL Server Data Tools for Visual Studio 2015
- A copy of the AdventureWorks2014 database is available for download at: https://accelebrate.s3.amazonaws.com/labfiles/AdventureWorksDW2014FullDatabaseBackup.zip for a bak file of the AdventureWorks2014 database.
- You may see the answer files from here if you wish.
Items created during this tutorial:
- SSISSample database
- ImportHRData.dstx package
- SampleSSISProject SSDT Solution
The Import and Export Wizard
Though SSIS is almost infinitely customizable, Microsoft has produced a simple wizard to handle some of the most common ETL tasks: importing and exporting data with only minor changes along the way. The Import and Export Wizard protects you from the complexity of SSIS while allowing you to move data between any of these data sources:
- SQL Server databases
- Flat files
- Microsoft Access databases
- Microsoft Excel worksheets
- Other OLE DB providers
Because moving data between Excel and other data stores typically requires data type conversions, many people find the Import and Export Wizard a good place to start, even when needing more complex transformations that can be added later once the wizard creates the base package.
You can launch the Import and Export Wizard from the Tasks entry on the shortcut menu of any database in the Object Explorer window of SQL Server Management Studio, from within SSDT, or as a stand-alone application from Windows.
Try It!
To import some data using the Import and Export Wizard, follow these steps:
- Launch SQL Server Management Studio and log in to your test server.
- Open a new query window.
- Enter this text into the query window:
- Click the Execute toolbar button, or press F5 to create the new SSIS Sample database.
- Expand the Databases folder in Object Explorer.
- Right-click on the SSISSample database and select Tasks ? Import Data.
Note: If the SSISSample database is not visible, right-click the Databases folder, and then click Refresh. - Read the first page of the Import and Export Wizard and click Next.
- Select SQL Server Native Client 11.0 for the data source, type your test server name in the Server name drop-down list, and then provide login information for your test server.
- Select AdventureWorks2014 in the Database drop-down list as the source of the data to import.
- Click Next.
- If you are running SQL 2012 or earlier, and because you're importing data, the next page of the wizard will default to connection information for the SSISSample database. If you are running SQL 2014 or later, select SQL Server Native Client 11.0. Once you select the appropriate destination driver, verify that the remaining information is correct, and then click Next.
- Select Copy data from one or more tables or views, and then click Next. Note that if you only want to import some of the columns from a table, or join multiple tables together, you can use a query as the data source instead. For real life scenarios, you should always write queries and select only the required data to pull into the pipeline.
- Click the check boxes to select the HumanResources.Department, HumanResources.JobCandidate and HumanResources.Shift tables, as shown in Figure 1. As you select tables, the wizard will automatically assign names for the target tables in the Destination column.
- Highlight the HumanResources.Shift table and click on the Edit Mappings button.
- The Column Mappings dialog box lets you change the name, data type, and other properties of the destination table columns. You can also set other options here, such as whether to overwrite or append data when importing data to an existing table. Click Cancel after reviewing the options.
- Click Preview to review the data that will be moved, and then click OK to close the Preview Data window.
- Click Next on the Select Source Tables and Views page of the wizard.
- Verify the Run Immediately option is selected.
- Select Save SSIS Package, select the File system option, and then click Next.
- Type ImportHRData in the Name field, make note of the File name and location so that you can find it later in this tutorial, and then click Next.
- Review the steps that will be performed, and then click Finish to run the import. SQL Server will display progress as it performs the import, as shown in Figure 2.
- Click Close to close the wizard.
- In Object Explorer, expand the Tables folder under the SSISSample database to verify that the import succeeded. If you do not see the tables, right-click Tables folder, and then click Refresh.
USE master; CREATE DATABASE SSISSample;
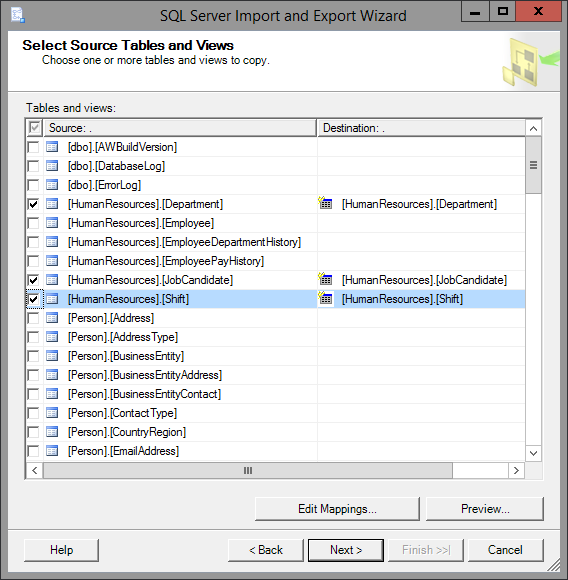
Figure 1: Selecting tables to import
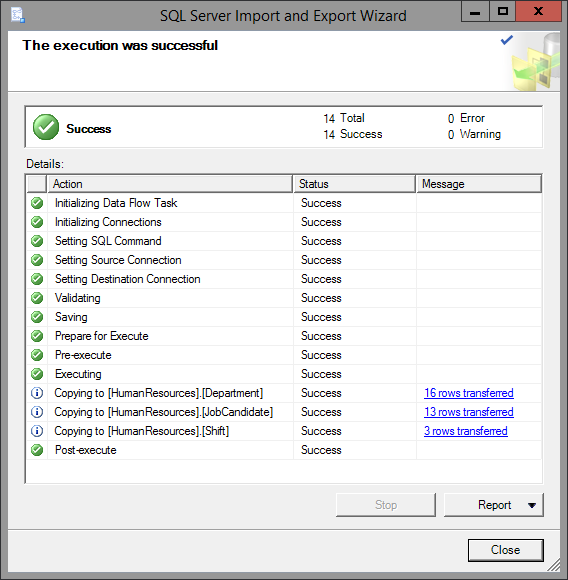
Figure 2: Import Wizard results
Adding Packages to a Project
Once you have created a package by using the Import and Export Wizard, you can then import that package into a project to add additional features or simply to maintain the code in some sort of source control such as GitHub or Team Foundation Server (TFS).
Try It!
Use the following steps to create a new project in SQL Server Data Tools and add the package you created early in this tutorial to the project.
- Launch SQL Server Data Tools for Visual Studio 2015.

Note: The images in this tutorial were captured with SSDT for VS 2015 and the project defined with the SQL Server 2016 compatibility level.
- Click File >? New >? Project.
- In the New Project dialog box, verify that the Integration Services Project template is selected as shown in Figure 3. Type SampleSSISProject in the Name box, make note of the location so that you can find it later, and then click OK.
- If you don't see Solution Explorer (typically located to the right side of SSDT, click View ? Solution Explorer.
- Under the SSIS Packages folder in Solution Explorer, right-click Package.dtsx, and then click Delete. Click OK to confirm the permanent deletion. You do not need this package created by default because you will be importing the package you created with the Import and Export Wizard.
- Right-click the SSIS Packages folder, and then click Add Existing Package.
- Verify that the Package location drop-down list is set to File System.
- Click the ellipsis (…) next to the Package path to launch the Load Package dialog window as shown in Figure 4.
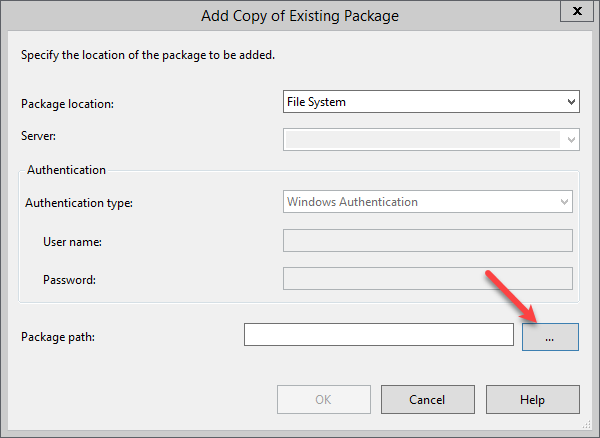
Figure 4: Load an existing package
- In the Load Package window, browse to where you saved your package earlier in this tutorial, click on the package that you created so that it appears in the File name box, and then click Open.
- The package should now appear under the SSIS Packages folder. Double-click the ImportHRData.dtsx package to open the Package Designer.
- Double click on each of the two tasks and review the steps that the wizard created.
- Save and close your project.
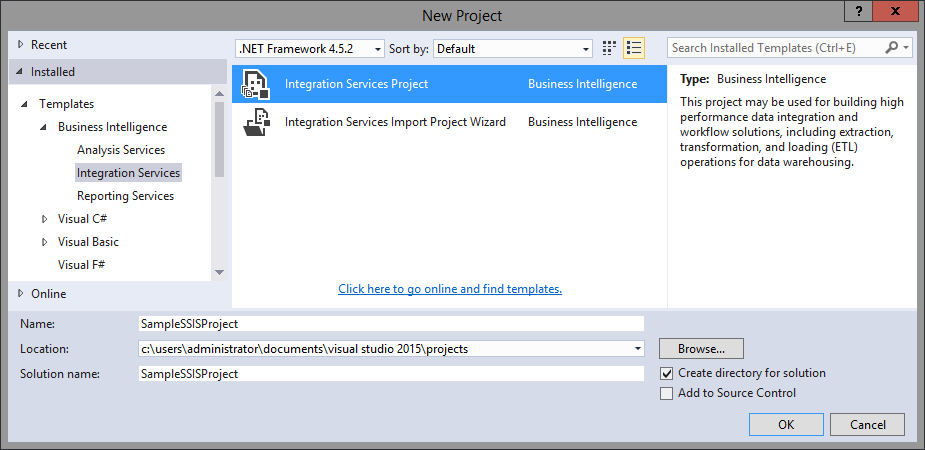
Figure 3: Creating a new project
| | If you try and run this package, it will fail. The first step creates tables that now exist in your SSISSamples database. You can right-click the Preparation SQL Task 1 task and click Disable. The package will now run successfully, but you will have twice as many rows in each table. |

In the next tutorial, you will build a package from the ground up by using SQL Server Data Tools.
In-Depth SSIS Training
For in-depth SSIS training, click here to view all of Accelebrate's SSIS training courses for you and your staff.
Request Pricing
How To Install Sql Server Integration Services 2016
Source: https://www.accelebrate.com/library/tutorials/ssis-2016-part1
Posted by: whytewithem1953.blogspot.com
0 Response to "How To Install Sql Server Integration Services 2016"
Post a Comment